
Etched Kits
So what is an etched kit, and how are they made?
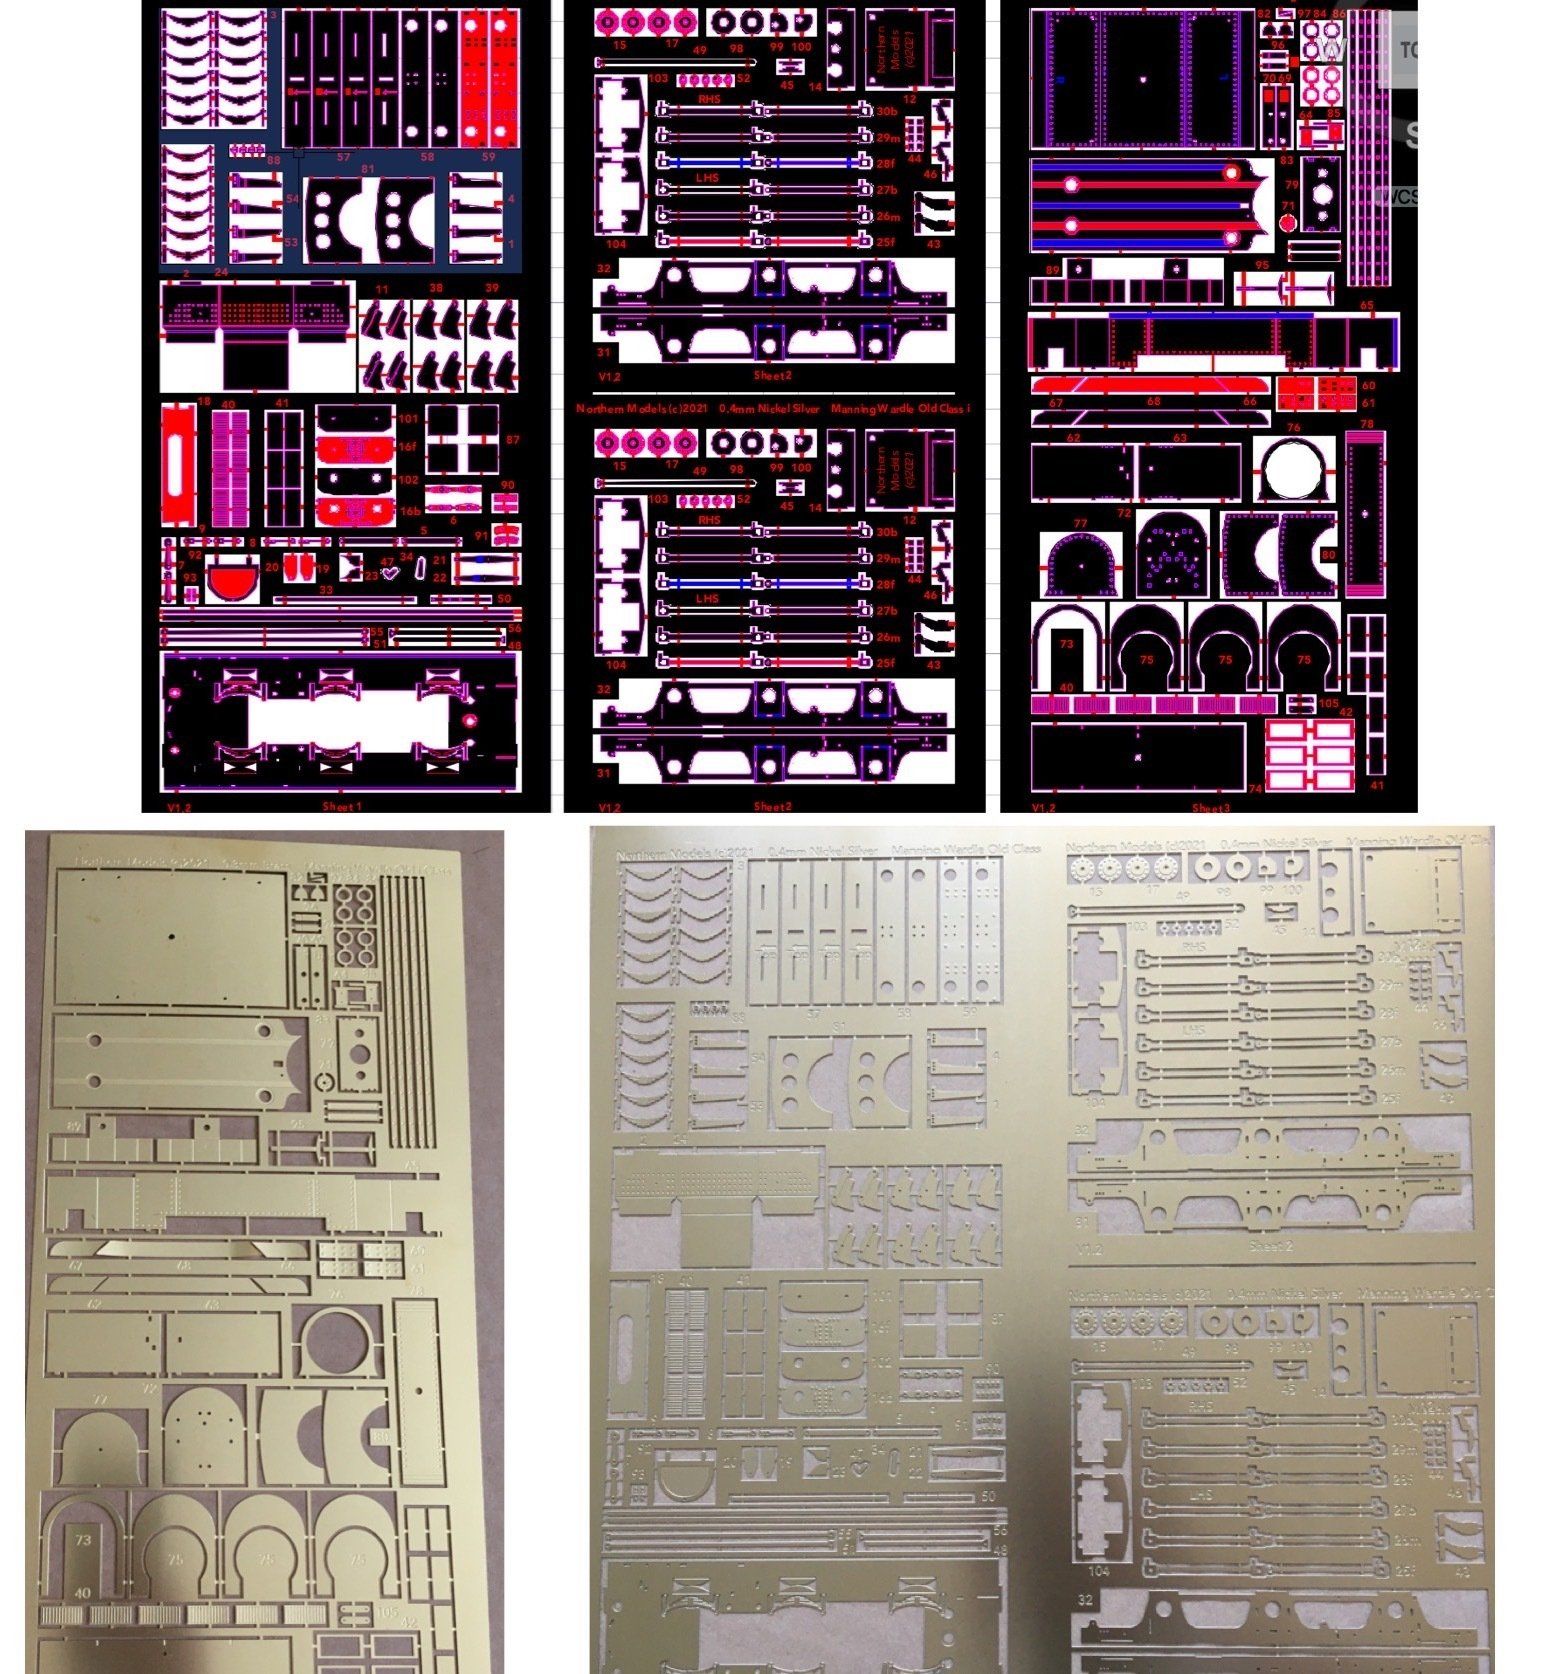
In short, an etched kit provides a series of accurate parts that the average modeller, with a set of relatively basic tools can construct into a beautiful, well-running model. Broadly speaking, a kit comprises of the etches, castings, thorough instructions and optional wheels and gearbox/motor (optional in terms of buying from Engine-ious - you'll need them at some point, from somewhere!). But what goes into producing a kit? Find out below....

From Archives to Action: The Research Process
Once a prototype has been decided upon for a model, a thorough process of research is undertaken. As much of the history of the chosen prototype is discovered as possible through books, online, magazines and journals, as well as interacting with knowledgable members of various modelling forums. This forms a complete picture of the locomotive.
Crucially in terms of designing the etches, any works drawings (general arrangements etc) that may exist, or other forms of scale drawings are collected so that each etched part is dimensionally accurate.
As our kits tend to be of older prototypes, works drawings can sometimes be difficult to obtain, or simply not exists anymore. Consequently, the dimensions of some parts may have to be determined from referenced known dimensions on other parts of the loco.
Crafting the Blueprint: Designing the Etched Parts
Once the research is complete, it's time to start designing the etches that will eventually build up to form the locomotive. Careful measurements are taken from the drawings, with each part carefully considered. Detail is imperative, with even our most basic kit containing over 100 etched parts, plus castings and other components. Designing the etches is the longest stage of the whole process; great care is taken to consider the builder when designing how parts should fit together, to make it as simple as possible to construct.
CAD software is used to create the designs, which ensure accuracy of fit - crucial for an enjoyable building experience. Colours are used to denote where there should be full thickness metal or half thickness (half-etch). Once complete, the design is sent off to a specialist etching company to transform the digital file into sparkling reality.
Casting the Character: From Master to Metal
The quality of castings in many ways can make or break a kit, especially in terms of the enjoyment for the builder. The last thing anyone wants to do it spend hours with files and abrasives trying to turn poor quality castings into something recognisable. Poor quality often stems from worn, old moulds, so we remove this from the equation completely....
Each casting starts life as a 3D model on the computer, which is then 3D printed using a castable resin. The prints are surrounded with investment material, after which the 3D print is removed through a 12 hour, 700oC burnout cycle. A highly detailed void is left in the investment, which is filled with molten brass under vacuum. Brass is chosen as the medium because it has far greater durability and workability than white metal, which is often used as a cheaper alternative.
Casting is not an exact science, but our method produces consistently high quality castings that require very little work, if any, to fettle up.
See the section below for more details on the casting process.
Wheels: The Driving Force
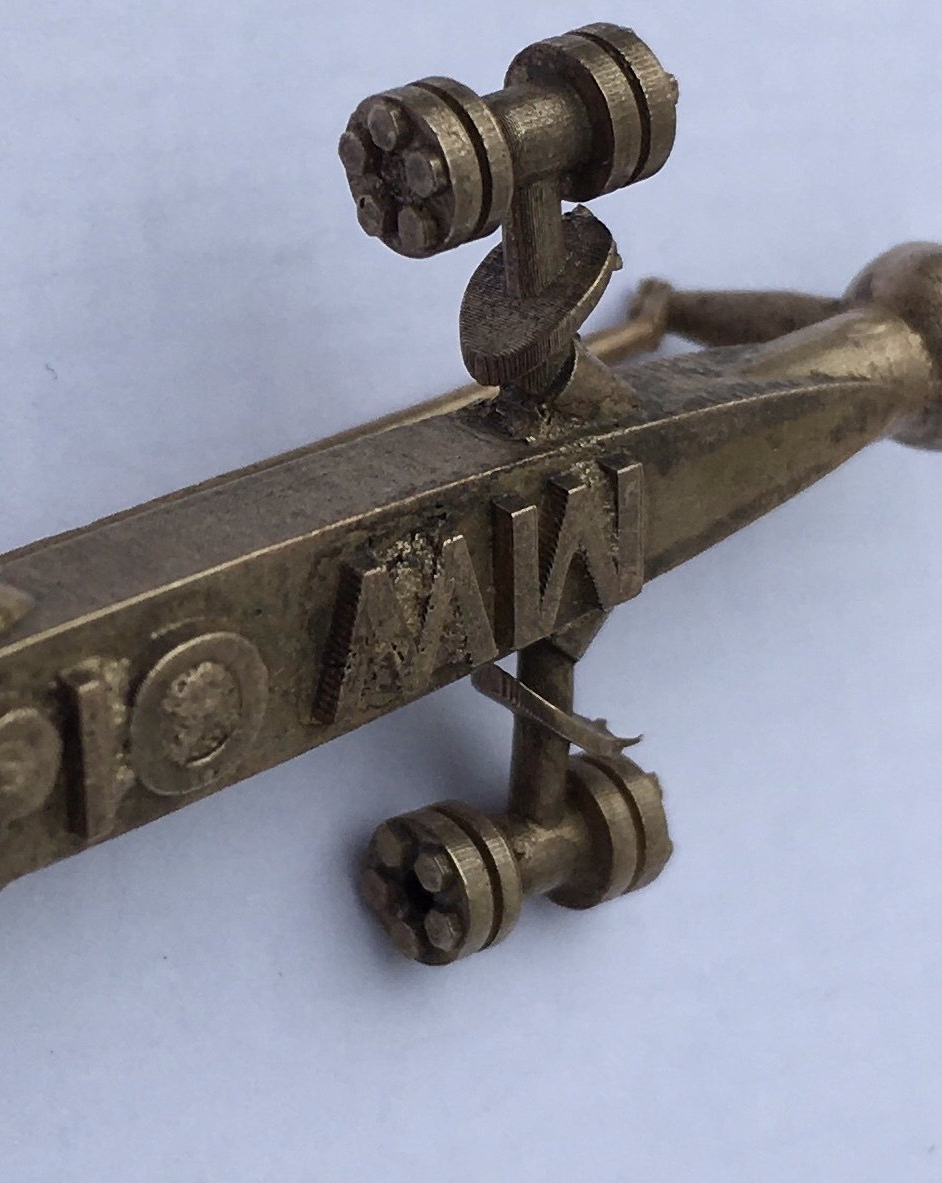
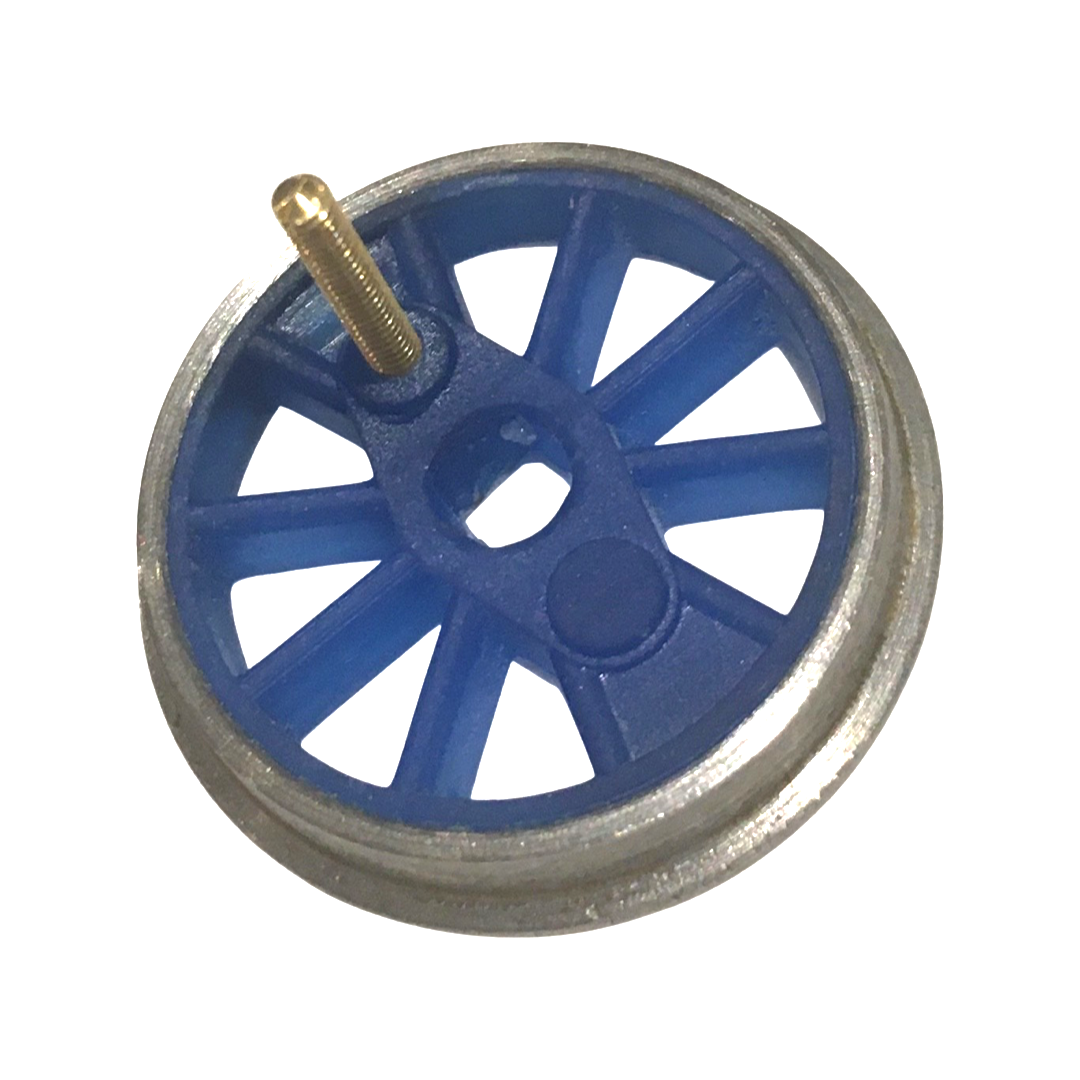
Very few kits these days come complete with wheels. However, prototypical wheels for old indutrial locomotives are hard - sometime impossible - to find. Therefore we make our own. Designed to fit a standard Slaters 3/16" or 1/8" axel, they are easy to fit, quarter and remove.
The tyre is accurately turned from high quality steel, with the wheel centre being moulded in resin around a precision metal boss. Crankpins are tapped through the wheel with a 10BA screw.
Testing and Refining: Perfecting the Kit
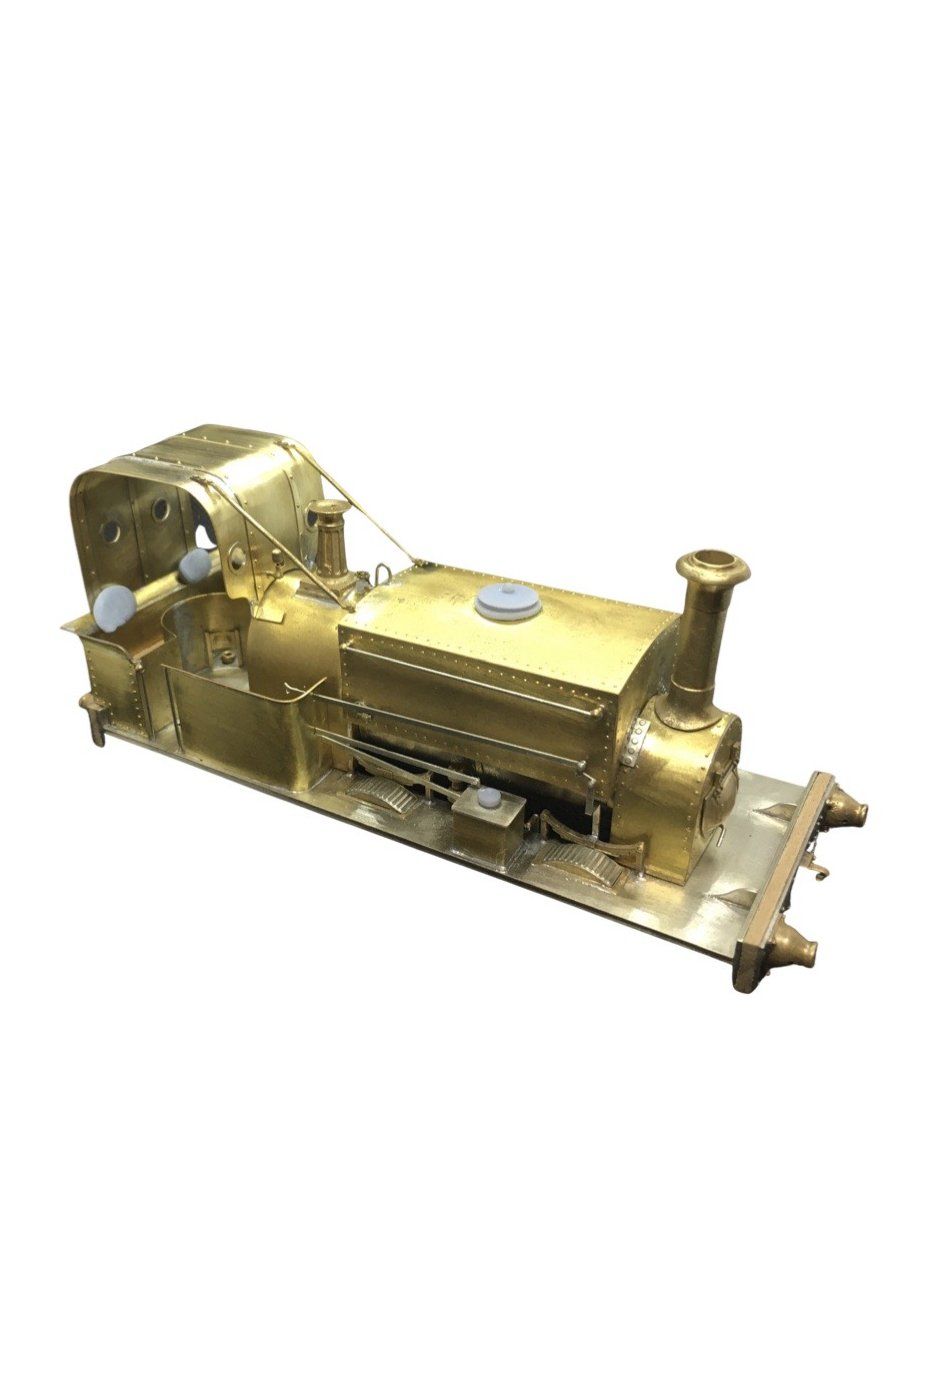
The final stage in creating a kit - and probably the most important - is doing a test build. Errors, imperfections, ommisions and improvements are discovered during the test build. These are rectified on the CAD artwork, ready to be re-etched/cast for the next version. Another test build is done until we are happy everything is perfect.
It's during this process that we write the comprehensive instructions. Detailed written descriptions and explanations, coupled with photographs and diagrams provide step by step instructions to guide you effortlessly through the build.
Ready to buy now? Go on......click the 'Products' link in the menu about and see what might tempt you :-)
BRASS CASTINGS
Think of an etched metal kit like the skeleton of a person—thin, flat, and precise. It's made up of carefully shaped ‘bones’ that give structure to the whole model. But brass castings? Those are like the muscles and facial features—they add depth, shape, and character. You can’t have a lifelike figure with just bones, and you can’t have a detailed model loco with just flat parts. The castings bring the curves, pipes, domes, and detail to life. Castings are often the bane of the kit-building experience, as they are often made using old, worn out moulds. At Engine-ious Models, we eliminate this problem by not using moulds at all, ensuring superb castings every time. Follow the tabs below to find out the process of making beautiful, lost resin castings.

From Concept to Creation: The 3D Modelling Process in CAD
To produce the finely detailed parts used in our brass castings, we begin with a digital design created in a CAD package. This allows us to model complex shapes—like domes, pipework, or fittings—with precise control. The fit of the part can be checked against the model, ensuring the correct design and dimensions at the first attempt, ultimately saving the customer money. 3D renders are sent to the customer for approval, and any changes requested can be easily made.
From Screen to Reality: 3D Printing the Masters
Once the design is complete, it’s sent to a resin 3D printer, which builds the part layer by layer using a special castable resin. This resin is formulated specifically for investment casting. It prints with exceptional resolution, capturing the finest surface detail—even rivets or embossed lettering. The 3D model is sliced into hundreds of layers, which is printed one at a time.

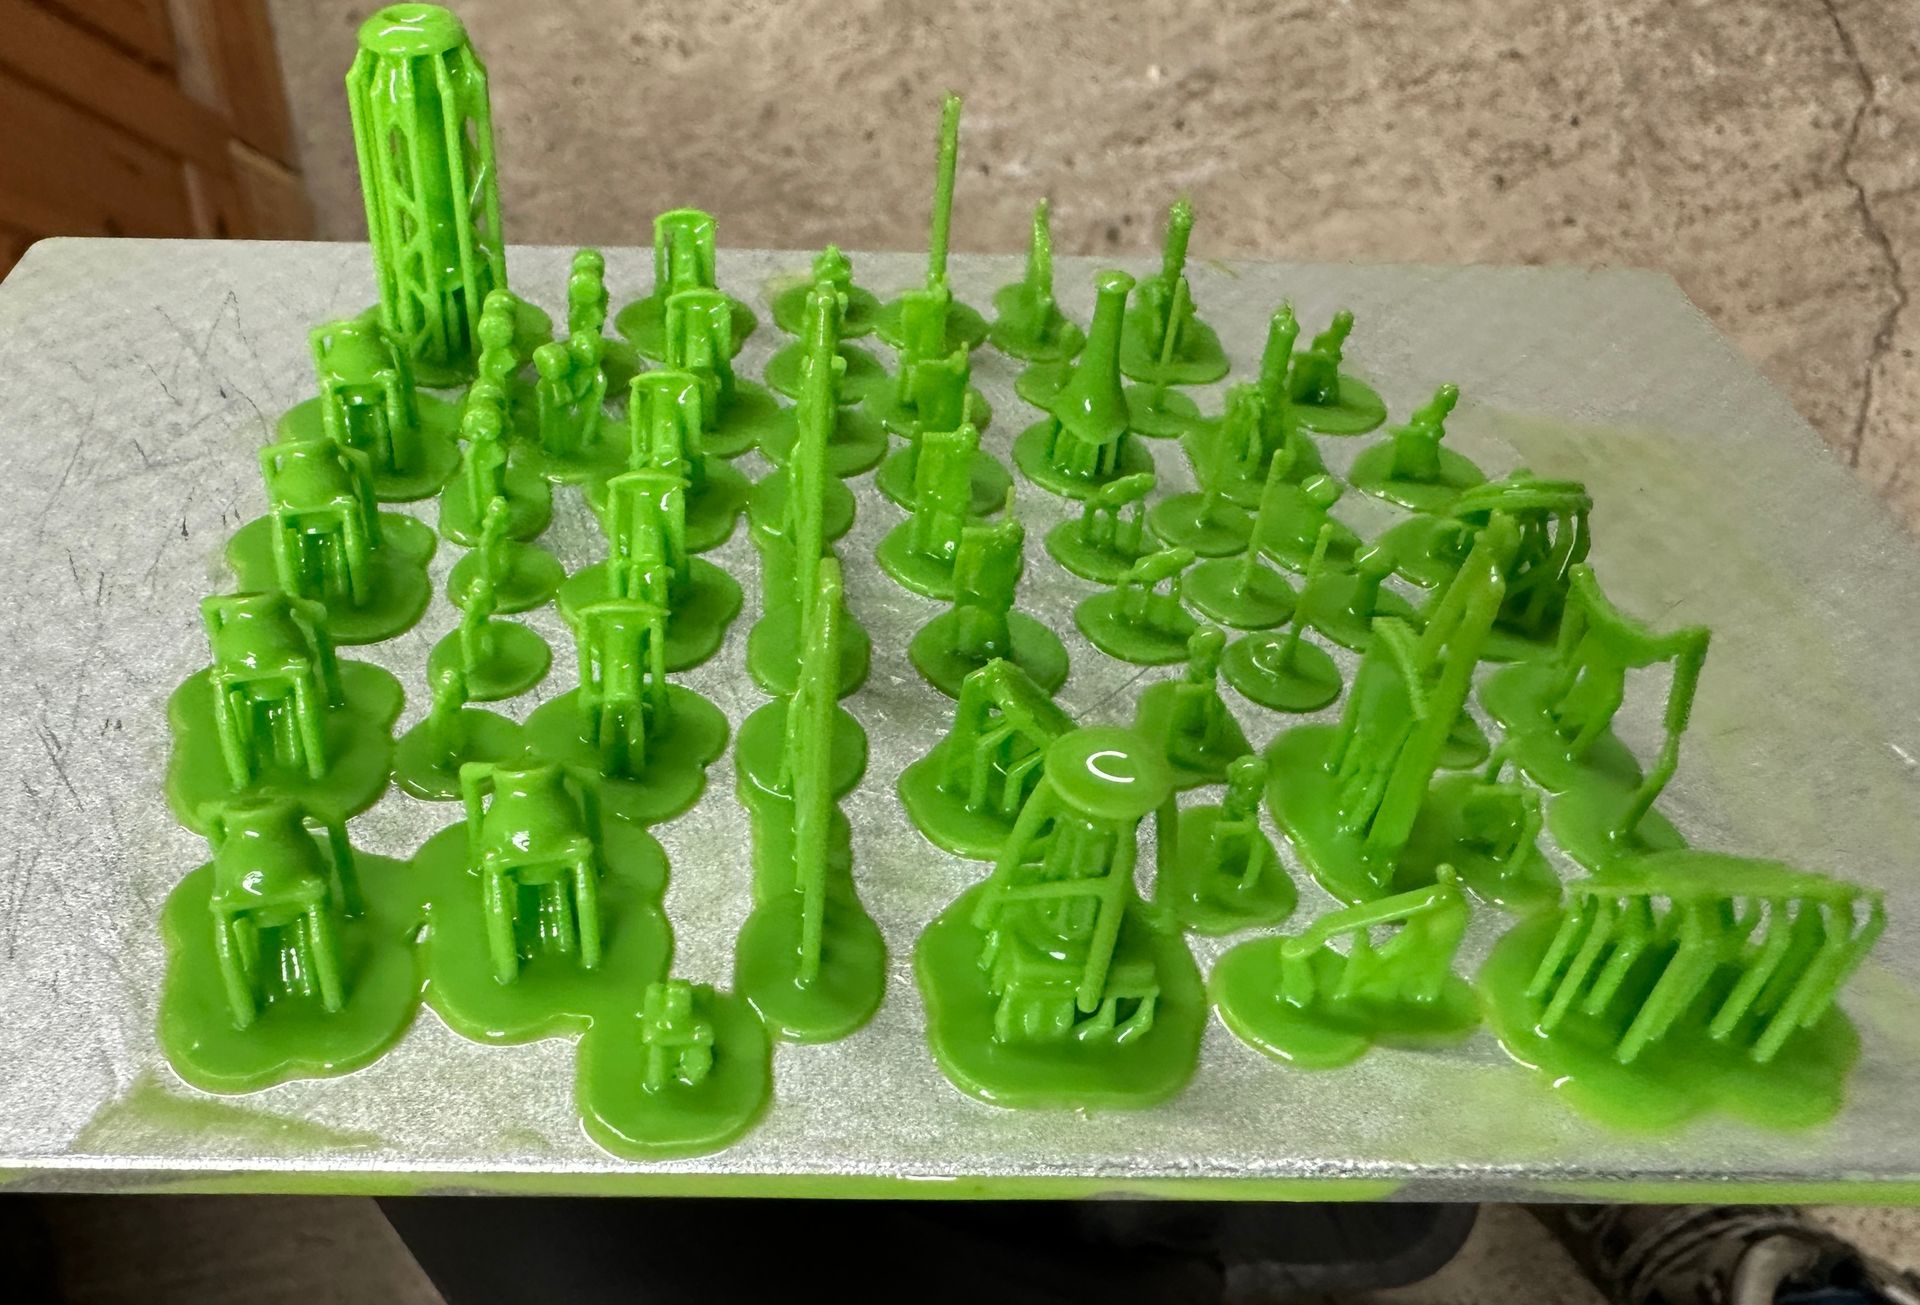
Branching Out: Assembling the Casting Tree
Once the 3D printed masters are complete, the next step in the casting process is to build a casting tree—a structure that allows multiple parts to be cast in brass at the same time.
Each printed part is attached to a central wax stem, like branches on a tree. These connections, made from wax rods, are called sprues—they act as channels for the molten brass to flow through during casting.
The goal is to arrange the parts in a way that ensures even metal flow, minimal turbulence, and clean detail with no air pockets. Careful positioning also helps reduce material waste and makes the final brass parts easier to separate and clean up.
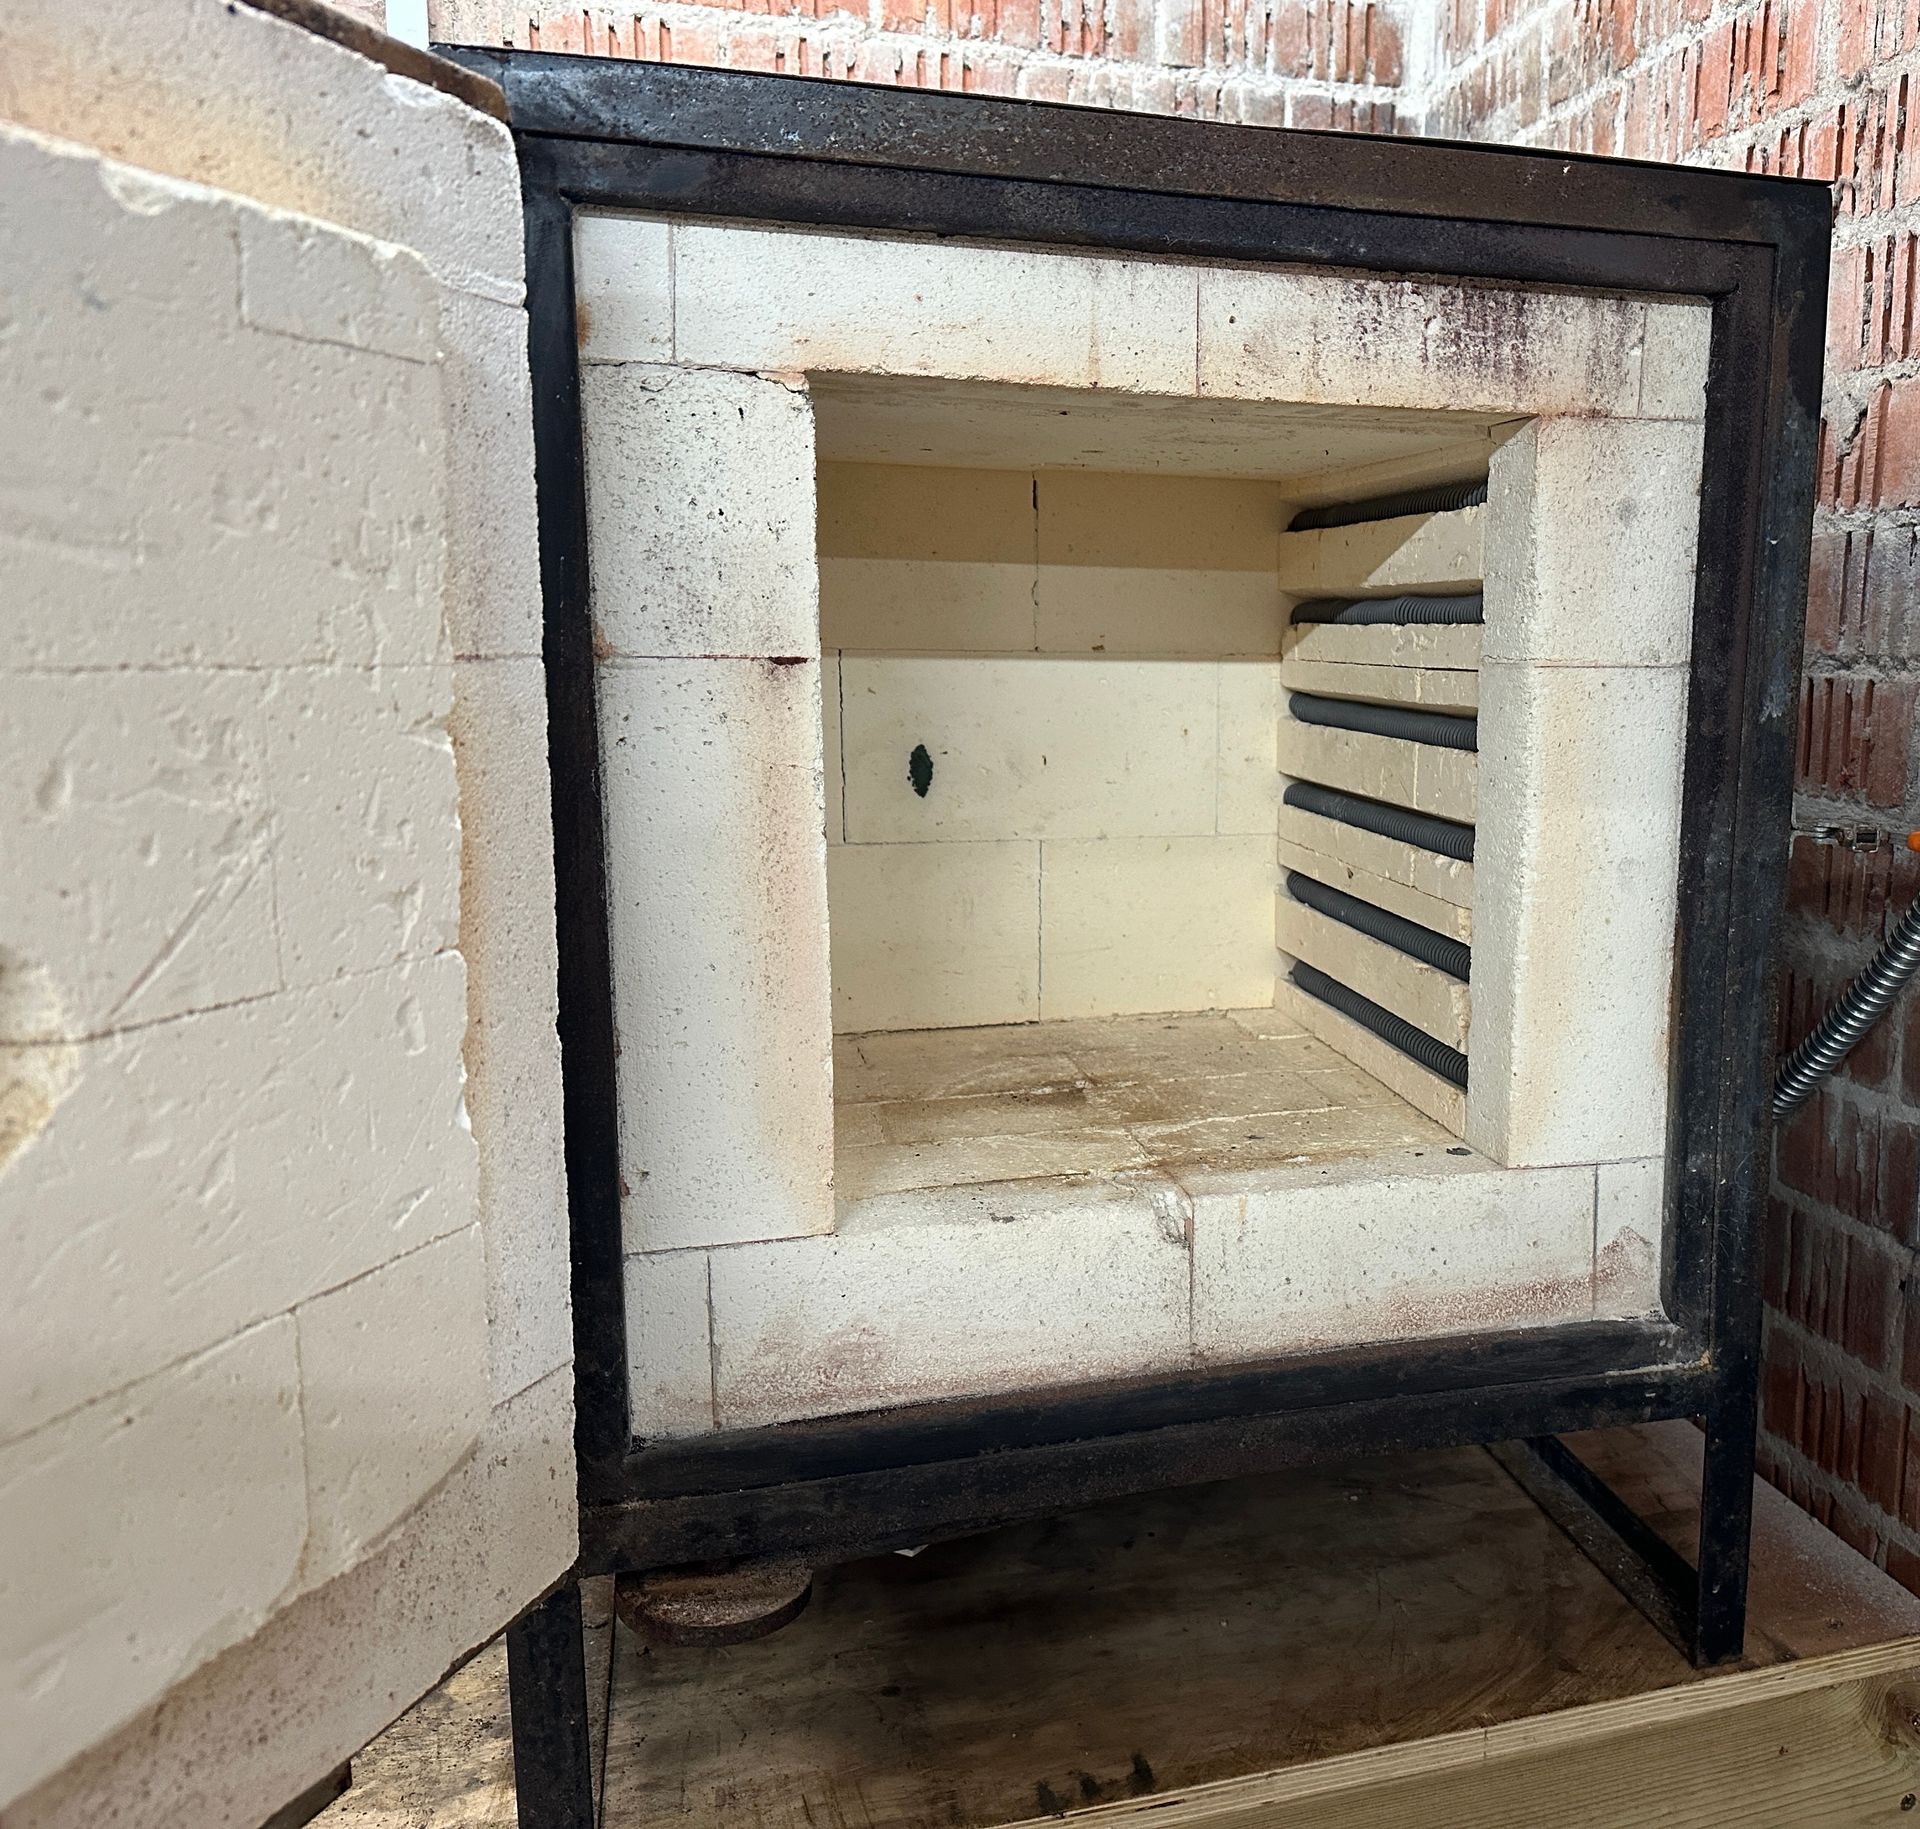
The Burnout Process: Preparing the Mould for Casting
Once the tree is fully built, it’s placed into a stainless steel flask and surrounded by a heat-resistant investment material, forming a mould.
This is placed into a kiln which follows a carefully composed schedule of temperature ramps and holds, reaching temperatures of 750oC. In order to achieve the outstanding surface finish on the castings as we demand, this process should not be rushed. A full burnout program can take over 14 hours.
During the burnout process, the wax and resin completely burn away, leaving behind hollow cavities, ready for the next stage....

Melting the Brass and Vacuum Casting – Precision in Every Pour
After building the casting tree and investing it in a ceramic mould, the next critical stage is preparing the brass and mould for casting.
The process begins by melting the brass in a specialist furnace or crucible. The exact melting and pouring temperatures vary slightly depending on the size and thickness of the castings, but range between about 960oC - 1020oC. Throughout, great care is taken not to overheat the metal, as excessive temperatures can cause oxidation, gas porosity, or compromise surface finish.
Meanwhile, the ceramic mould (flask) is held at an ideal casting temperature.
For small or fine-detail parts, the flask is typically kept at around 550°C to 600°C at the moment of casting. For larger or thicker castings, the flask temperature may be a little lower, around 500°C, to prevent metal shrinkage problems.
Keeping the mould hot helps the molten brass flow into every fine detail and prevents the metal from solidifying too early.
When the brass is at the right temperature and the flask is ready, the casting is performed using a vacuum casting machine.
The flask is placed into the vacuum chamber immediately before pouring. As the molten brass is poured into the mould, the vacuum system draws out air from the investment, helping the metal reach every corner without trapping bubbles.
This method produces highly detailed, clean castings—essential for replicating the sharp features needed in model locomotive parts.
After casting, the flask is left to cool naturally before the investment mould is broken away, revealing the freshly cast brass parts—each a perfect reproduction of the original 3D printed masters.